
Quick answer: the best Stardew Valley greenhouse layout depends on what you repeat every day. Use a crop-first grid when you want the most predictable planting space, a fruit-tree edge when long-term fruit matters, or a mixed plan when you want both crops and a comfortable walking route. Start with the 10×12 usable interior, mark sprinkler coverage, then reserve the edges before filling every tile.
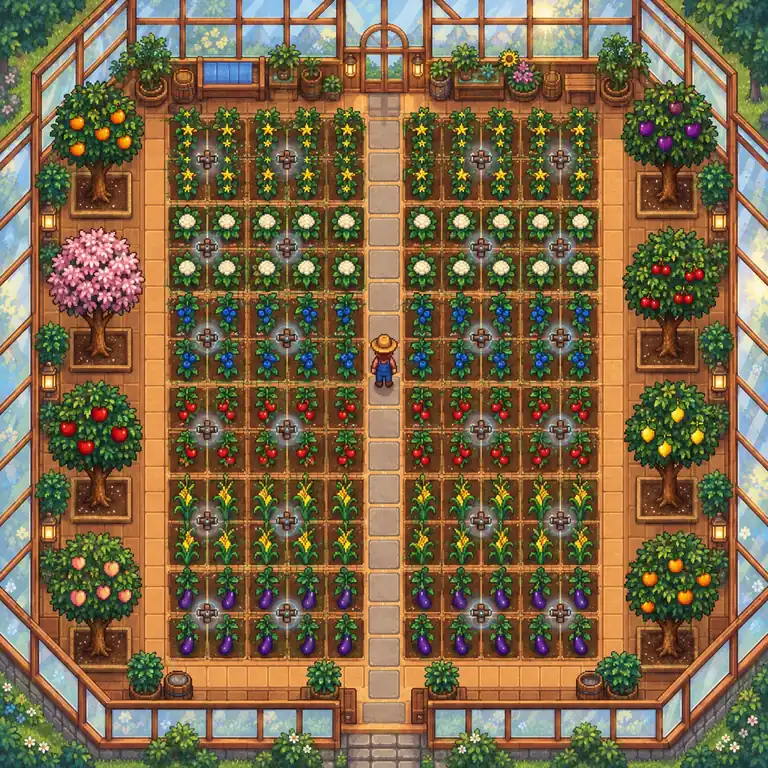
Greenhouse constraints that shape every layout
The greenhouse looks open, but the usable growing area is fixed. In the standard building, the central interior gives you a 10×12 planting grid. That is 120 tillable tiles before you account for sprinklers, paths, machines, or trees. The number is useful because it prevents a common planning error: copying a beautiful screenshot without checking how much of the floor is actually available for crops.
Think in three layers. First, reserve access: the door, a route through the room, and any tiles you need to reach crops or machines. Second, place permanent objects such as sprinklers, chests, or fruit trees. Third, fill the remaining tiles with crops that match your processing capacity and play rhythm. If you reverse that order, a full-looking greenhouse can become awkward to harvest.
This guide describes a base-game planning approach for current 1.6.x saves. It does not simulate mods, multiplayer collision edge cases, remixed bundles, or future balance changes. Confirm exact object rules in your current game before spending rare items.
| Decision | What to reserve first | Why it matters |
|---|---|---|
| Crop-first | Sprinkler footprints and a short harvest lane | More planted tiles, fewer decisions each season |
| Fruit-tree edge | Tree growth clearance around the border | Fruit trees take time and are difficult to move once the room is busy |
| Mixed production | Path, chest or machine corner, then crops | Daily collection is faster even if the raw crop count is lower |
Three Stardew Valley greenhouse layout patterns
There is no universal best greenhouse layout. A strong plan makes one routine easier and accepts a visible tradeoff somewhere else. The three patterns below are easier to compare than a long list of screenshots because they start from the job you want the room to perform.
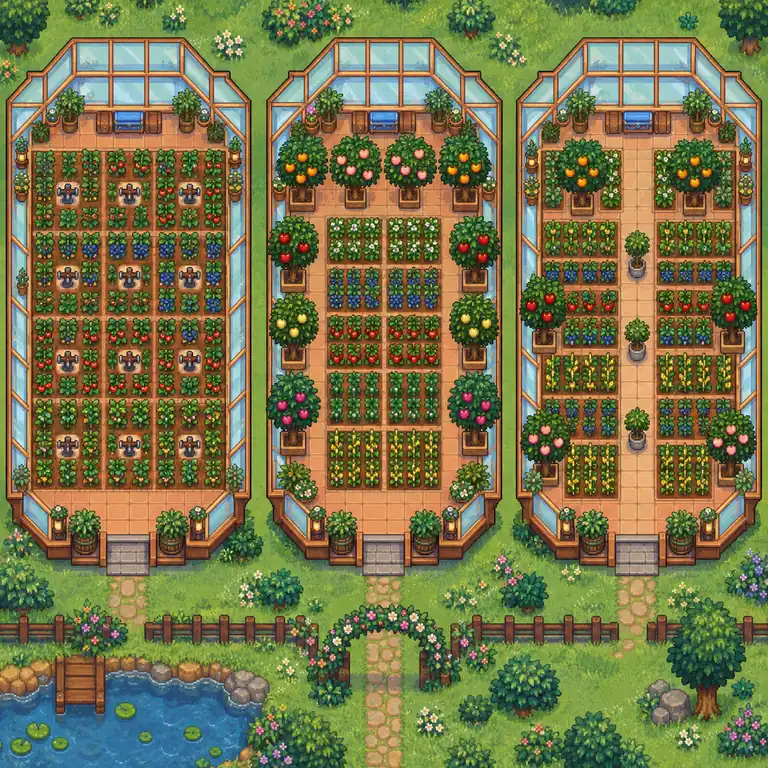
1. Crop-first grid
A crop-first grid puts sprinklers into a repeatable pattern and keeps most of the 10×12 area planted. It works well when the greenhouse is your dependable source of high-value crops, when you change crops between goals, or when you do not want to walk around trees. Put the watering hardware down first, leave a narrow route from the door, and group crops by harvest timing rather than by color.
The tradeoff is flexibility. A dense grid leaves less room for machines and can make a late-game rework annoying. It also encourages planting more than you can process. The crop profit calculator is useful here because it lets you test a smaller crop count against your own seed cost, sell price, harvest count, and processing assumptions.
2. Fruit-tree edge
The fruit-tree edge plan uses the greenhouse border for trees and keeps the central floor for crops. It is attractive for a long save because trees produce through the seasons, but it needs patience: a sapling must have the required clearance while it grows. Do not fill every surrounding tile with pots, chests, or crops until the trees have matured. Leave a visible buffer and check the current game rules if you are using a tight design.
This pattern is a good fit when you want a reliable fruit route for gifts, artisan goods, or a collection goal. It is less forgiving if you keep changing the room's purpose. Mark tree positions in a sketch before you buy saplings; moving a tree plan later usually means moving several other objects with it.
3. Mixed production room
A mixed layout reserves one edge for fruit trees, one compact machine or chest corner, and the center for irrigated crops. It produces fewer crop tiles than a pure grid, but it reduces the number of trips between planting, harvesting, and processing. For many players, that is the most comfortable greenhouse layout because it matches a real daily loop instead of maximizing a screenshot's filled area.
Use a mixed plan when you have a few kegs or preserve jars, want several crop types available, or are still deciding whether the greenhouse should be an orchard or a production room. Leave the most accessible crops near the path and put slower, less frequent harvests farther from the door.
Sprinklers, coverage, and paths
Sprinkler coverage is the practical center of a greenhouse layout. A basic sprinkler waters four adjacent tiles, a quality sprinkler covers a three-by-three area around itself, and an iridium sprinkler covers a five-by-five area. These ranges are useful planning references, not a reason to force one layout into every save. The right pattern depends on which sprinkler tier you actually own and how many empty tiles you are willing to keep around it.
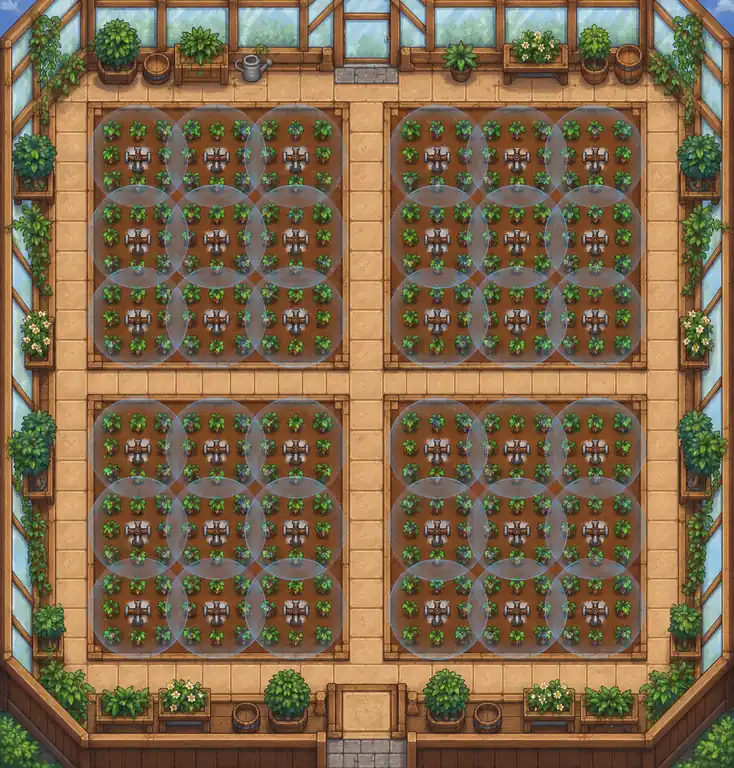
- Place the door route. Keep a short, obvious path from the entrance to the crop blocks. A single central lane is easy to understand, while two side lanes can make large blocks easier to harvest.
- Drop the sprinkler pattern. Count the tiles reached by the tier you own. Avoid placing a high-tier sprinkler where its outer ring lands on permanent objects or unusable floor.
- Check harvest access. Walk the route mentally from the door, through each crop block, and back out. If a trellis or machine corner creates a dead end, move the object before planting.
- Leave one change zone. Keep a small area open for a new crop, a chest, or a machine upgrade. The empty tiles are part of the plan, not wasted capacity.
Do not count the center tile of a sprinkler as a crop tile unless your chosen object can share that space in the current version. Treat the visual diagram as a draft, then test the exact footprint in-game. This is especially important when combining sprinklers with pots, machines, or a tight fruit-tree border.
Fruit trees: plan the edge before the crops
Fruit trees are the part of a greenhouse layout that punishes late decisions. They need room to grow and a clear surrounding area, so place them before you fill the floor. A tidy approach is to reserve a row or two along the outer edge, keep the center open for crops, and use the same spacing on both sides so the plan is easy to inspect.
Fruit trees also change the feel of the room. A full row of trees gives a stable harvest but can shade the visual center and limit where you put machines. A smaller pair or corner orchard leaves more crop flexibility. Decide whether your priority is fruit volume, a gift or artisan route, or an attractive mixed room. The answer determines how much border space is reasonable.
If you are unsure, sketch the tree positions in the site's farm planner first. The planner is a visual draft rather than a collision validator, but it makes spacing and walking lanes visible before you commit resources. For whole-farm connections outside the greenhouse, use the farm layout guide; it covers broader zones and daily routes rather than the greenhouse's interior grid.
How to validate a layout before rebuilding
A greenhouse plan is useful when it answers a daily question: can I enter, harvest, refill or collect, and leave without circling around permanent objects? You can test that question with a small paper sketch or the homepage tool.
- Name the job. Write crop-first, orchard, or mixed production at the top of the sketch. This keeps a pretty arrangement from quietly becoming a different plan.
- Mark fixed objects. Add trees, sprinklers, chests, machines, and the entrance before any crop tile.
- Trace the routine. Draw the route you take on a normal harvest day. Mark any tile that forces a backtrack or blocks a high-frequency crop.
- Run an economic check. Compare the crop count and harvest timing with the crop calculator. A smaller room can be better if it matches your seed budget and processing time.
- Keep a version note. Record the game version and any mod assumptions beside the plan. Recheck the layout after a major update or when you change platforms.
For seasonal decisions, pair the greenhouse plan with the site's spring crop guide, summer crop guide, and fall crop guide. Those pages compare seasonal timing and base-price assumptions; the greenhouse is where you decide whether the crop is practical to reach and process.
Common mistakes and the guide's limits
- Filling every tile immediately: you lose the buffer needed for tree growth, machines, or a later crop change.
- Copying a screenshot without its assumptions: the original plan may use iridium sprinklers, a different save year, or a mod.
- Optimizing crop count over movement: one blocked lane can add more daily friction than a few missing crop tiles.
- Mixing raw and processed profit: crop price, artisan value, machine count, and processing time are separate decisions.
- Treating the planner as a collision checker: the homepage tool helps compare relationships; it does not replace current in-game rules.
The exact best greenhouse layout is therefore a decision, not a ranking. If your priority changes from money to gifts, from crops to fruit trees, or from solo play to co-op, the right empty space changes too. Revisit the plan when the routine changes.
Stardew Valley greenhouse layout FAQ
What is the best Stardew Valley greenhouse layout?
There is no single best plan. A crop-first grid suits predictable planting, a fruit-tree edge suits long-term fruit, and a mixed plan suits players who want crops, machines, and a short daily route in one room.
How many crops fit in the Stardew Valley greenhouse?
The standard interior has a 10×12 usable growing area, or 120 tillable tiles before sprinklers, trees, paths, and machines take space. Your practical crop count is lower when you reserve access and permanent objects.
Where should fruit trees go in a greenhouse layout?
Plan them along the outer edge or in a dedicated border before planting crops. Leave the required growth clearance around each sapling and confirm the current version's rules before filling nearby tiles.
Which sprinkler is best for a greenhouse layout?
Use the highest tier you can maintain without wasting coverage on permanent objects. Basic sprinklers cover four adjacent tiles, quality sprinklers cover a three-by-three area, and iridium sprinklers cover a five-by-five area around the fixture.
Should a greenhouse layout include a path?
Usually yes. A short path from the door and between crop blocks makes harvests easier to repeat and leaves room for a chest or machine corner. A fully planted room can be efficient on paper but slower to use.
Is the Valley Ledger planner an exact greenhouse collision checker?
No. It is a visual planning board for comparing zones, paths, and object relationships. Use it before rebuilding, then confirm exact footprints and collision rules in the current game or mod setup.
Summary
Start with the 10×12 growing area, reserve the door route and permanent objects, then choose crop-first, fruit-tree edge, or mixed production. Sprinkler coverage should make the route shorter, not merely make the room look full. Test the sketch in the homepage planner, compare crop assumptions with the calculator, and confirm exact growth and collision rules in your current save.
Sources and scope: Stardew Valley Wiki: Greenhouse, Sprinkler reference, and the official Stardew Valley site were checked for the planning boundaries. The wiki is community maintained, not an official developer database. Visuals on this page are original conceptual diagrams generated for explanation and are not official game screenshots.